Newer
Older
---
adapted-from: https://app.clickup.com/2189764/v/dc/22ue4-596/22ue4-358
---

# Access GitLab

1\. Environment requirements
============================
You will be using the following programs the jeodpp provides:
*   Bash.
*   PyCharm.
*   Compass the GUI for MongoDB (soon to be available).
2\. Configure authentication
============================

2.1 Access Tokens
-----------------
* Log into Gitlab [https://gitlab.jrc.nl/](https://gitlab.jrc.nl/)and click your Profile -> Settings -> Access Tokens

* Create a new access token:
* Choose a self-explanatory name, eg <you-username>@<your-PC-name>
* tick `read_repository` and `write_repository` scopes
* click `Create personal access token` button
* Copy the token into your clipboard - it will be only visible until you close/refresh the page; afterwards you would have to re-create it.
* Try to clone:
```plain
git clone https://jeodpp.jrc.ec.europa.eu/apps/gitlab/use_cases/legent/uds-scripts.git
45
46
47
48
49
50
51
52
53
54
55
56
57
58
59
60
61
62
63
64
65
66
67
68
69
70
71
72
73
74
75
76
77
78
79
80
81
82
83
84
85
86
87
88
89
90
91
92
93
94
95
96
97
98
99
100
101
102
103
104
105
106
107
108
109
110
111
112
113
114
115
116
117
118
119
120
121
122
123
124
125
126
127
128
129
130
131
132
```
OR add a new remote into your _existing_ local git-repo and then try to fetch:
2.2. SSH keys
-------------
SSH keys are (probably?) needed if you access gitlab through `git://...` url-schemes.
**Steps**
1. Generate SSH key
Gitlab [https://gitlab.jrc.nl/](https://gitlab.jrc.nl/) ->Profile -> Settings -> Add SSH Key

Open Command line E:\\vecto\\clone\\vecto>ssh-keygen -t rsa -b 2048 -C "mail"
Copy id\_rsa.pub to the keys from Gitlab settings (.ssh/id\_rsa.pub)
Alternative, use Access Token. Generate token and copy. The clone will use https instead of ssh.
2\. Go to Gitlab petten Vecto Project

2\. Fork the project into a personal repo
=========================================
For the git workflow selected by the team, each developer works on an independent fork of the project visible to all the team members. ([Forking workflow](https://www.atlassian.com/git/tutorials/comparing-workflows/forking-workflow#:~:text=Forking%20is%20a%20git%20clone,org%2FuserA%2Fopen%2Dproject))
To create this fork click on the fork button at the top of the project page:

_Note:_ As a new team member of the team you might encounter an issue indicating that the limit of forks for this project has been reached:

In that case contact the system administrator and ask them to change the project limit for your account.
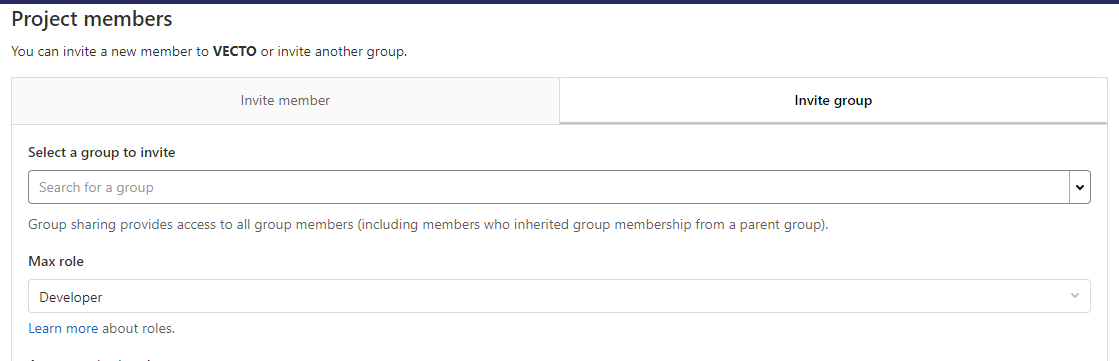
After adding the name information for the fork, it is necessary to give permissions to the rest of the team to make it visible for them. For this, go to the url:
[https://gitlab.jrc.nl/YOURUSERNAME/vecto/-/project\_members](https://gitlab.jrc.nl/munozme/vecto/-/project_members)
There select the tab _Invite group_ and add VECTO.
3\. Clone the repo
==================
In case you don't have a local repo open the command line and type the following command, make sure to change the url path to include your username:

In case you already have a local repo (for example, from github) you need to add a new remote and fetch it:
`git remote add {username} https://jeodpp.jrc.ec.europa.eu/apps/gitlab/{username}/uds-scripts`
148
149
150
151
152
153
154
155
156
157
158
159
160
161
162
163
164
165
166
167
168
169
170
171
172
173
174
175
176
177
178
179
180
181
182
183
184
4\. Configure your notification email
=====================================


The primary email assigned to your account is your EU email. This email is used for authentication and notifications. To view your gitlab notifications you need to login to your email and check the new notifications, which means you won't be able to see as soon as you get them unless you're logged into your EU account.

An alternative to see your notifications as soon as they arrive is changing your notification email to another email account.

To do this first access [https://gitlab.jrc.nl/-/profile/emails](https://gitlab.jrc.nl/-/profile/emails) and add a secondary email address to your account. You'll receive an email from gitlab asking you to verify your account. Then go to [https://gitlab.jrc.nl/-/profile/notifications](https://gitlab.jrc.nl/-/profile/notifications) and select the email address you just added as a notification address.


5\. Rename your remote
======================


The default name for a remote is origin, and given that we work all in forks of the same project but can also make changes to someone else's fork, we decided to rename the each remote. The new name corresponds to an identifier of the server and of the username of choice as long as is brief. It looks like "ptuser". The idea is to facilitate differentiating to which remote a change is being pushed and to be able to replicate a command to an specific remote without having to change the command. To rename use the command:


```plain
git remote rename origin ptuser
```


pro-tip: for _remoting_ commands, you may use directly the _url-of-a-repo_ in place of a _remote-name, eg:_


```plain
git push https://github.com/some/repo.git some-branch